Ensuring that your website appears in Google search results is essential for attracting visitors and growing your business. In fact, The #1 result in Google’s organic search results has an average CTR of 27.6%. To achieve this, it’s important to learn how to check if a page is indexed by Google. Indexing is the process by which search engines like Google store information about your web pages, making them searchable by users.
If a page isn’t indexed, it won’t appear in search results, making it invisible to potential visitors. In this guide, we’ll walk you through everything you need to know about indexing and how to check if your pages are indexed. We’ll also cover common barriers to indexing and how to overcome them, helping you ensure that all your important content is visible to the world.
What is a webpage?
Before diving into the technical details of indexing, let’s start with a basic definition: A webpage is a single document on the internet that can be accessed through a browser like Google Chrome or Firefox. Each webpage is a part of a larger website, much like a chapter in a book. Understanding what a webpage is helps clarify what gets indexed by search engines.
When we talk about indexing, we’re referring to Google’s ability to recognize and store information about individual web pages on your site so they can be shown in search results.
What is Google’s Search Index?
Now that we understand a webpage let’s talk about Google’s search index. Think of it as a massive digital library where Google stores information about every webpage it knows about. When you search, Google quickly scans its index to find the most relevant pages to display in the search results. For your website to appear in these results, its pages must be included in Google’s search index. If your pages aren’t indexed, they’re invisible to Google and your potential visitors.
What is Crawling in SEO?
To get a webpage into Google’s search index, Google first needs to discover it through crawling. Crawling is when Google uses automated bots, known as Googlebots, to scour the internet for new and updated pages. Imagine Googlebots as little explorers navigating the web, looking for new content to bring back to Google’s index. If a page isn’t crawled, it can’t be indexed, meaning it won’t appear in search results. Understanding this process is key to ensuring your pages are visible to your audience.
3 Quick Methods to Check If Google Has Indexed Your Page
Knowing how to check if Google has indexed your pages is crucial for maintaining a healthy website presence. Use these three quick methods to see if Google lists your pages in its index.
1. Use the URL Inspection Tool in Google Search Console
The URL Inspection Tool is a powerful feature within Google Search Console that allows you to check the indexing status of specific pages on your site. Here’s how to use it:
- Log into Google Search Console: If you don’t have an account, you must set one up and verify your website. Once you’re in, select the property (website) you want to inspect.
- Enter the URL: At the top of the dashboard, you’ll see a search bar. Paste the full URL of the page you want to check and press Enter.
- Review the Indexing Status: Google will provide a detailed report showing whether the page is indexed, any indexing issues, and suggestions for improvements.
When To Use The URL Inspection Tool
Imagine you’ve just published a new blog post about your latest product launch. You use the URL Inspection Tool to check if Google has indexed it. The tool shows that the page isn’t indexed yet, but there are no errors, so you request indexing directly through the tool. Within a few days, you check again and see that the page is now indexed and in search results!
2. Use The Page Indexing Report in Google Search Console
The Page Indexing Report provides an overview of which pages on your website are indexed and highlights any that aren’t. This is a great way to see the bigger picture and identify widespread issues. Here’s how to use it:
- Navigate to the Coverage Report: In Google Search Console, find the “Coverage” report under the “Index” section.
- Review Indexed and Non-Indexed Pages: The report will show you a list of all the pages Google has indexed and those it hasn’t, along with reasons why. This could include errors, redirects, or pages blocked by your robots.txt file.
- Investigate Issues: If important pages aren’t indexed, click on the specific issue to learn more details and how to fix it.
When To Use The Page Indexing Report
You run an e-commerce site and notice that some product pages aren’t performing well in search. By checking the Page Indexing Report, you discover several pages aren’t indexed due to crawl errors. You resolve the errors and request re-indexing, helping your products appear in more search results and boosting sales.
3. Use the “site:” Command
The “site:” command is a simple but effective way to see which pages of your website Google has indexed. Here’s how to use it:
Mind Your Business Newsletter
Business news shouldn’t put you to sleep. Each week, we deliver the stories you actually need to know—served with a fresh, lively twist that keeps you on your toes. Stay informed, stay relevant, and see how industry insights can propel your bottom line.
Subscribe to Mind Your Business
- Go to Google.com: Open your web browser and head to Google’s homepage.
- Type the Command: In the search bar, type “site
.com” (replace “yourwebsite.com” with your actual domain) and hit Enter. - Review the Results: Google will display a list of all the pages it has indexed for your site. This is a quick way to see if a particular page is included without logging into Google Search Console.
When To Use The “Site:” Command
You’re curious if a recent customer testimonial page you added is indexed. By using the “site:” command, you can quickly see if it’s listed among the search results. If it’s not, you know to investigate further using Google Search Console.
Understanding Potential Barriers to Indexing
Before ensuring all your pages are indexed, it’s important to check for any barriers that might prevent them from being indexed by Google. Here are a couple of key factors that can block a page from appearing in search results:
1. What is a Robots.txt File?
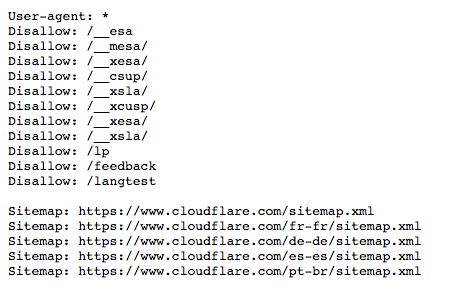
The robots.txt file is a simple text file located in the root directory of your website. It tells search engines which pages they can and cannot crawl. If a page is blocked in the robots.txt file, it won’t be crawled or indexed by search engines. Here’s how to check it:
- Access Your Robots.txt File: To do this, add “/robots.txt” to the end of your domain (e.g., yourwebsite.com/robots.txt). This file should be publicly accessible.
- Look for Disallowed Pages: Check for any “Disallow” directives that might block important pages. These directives tell search engines not to crawl certain pages or directories.
Example Scenario: Let’s say you find a “Disallow” directive blocking your blog directory. By removing this line from the robots.txt file, you allow Google to crawl and index all your blog posts, increasing their chances of appearing in search results.
2. What is a Noindex Tag?
A no-index tag is an HTML tag that specifically tells search engines not to index a particular page. This tag can be added intentionally to keep certain pages out of search results, but it can also be added by mistake, preventing important pages from being indexed. Here’s how to check for it:
- View the HTML Source Code: Right-click on the page and select “View Page Source” or press Ctrl+U (Cmd+U on Mac). This will open the HTML source code of the page.
- Search for the Noindex Tag: Use Ctrl+F (Cmd+F on Mac) to open the search function and type “noindex.” If you find this tag in the code, it means the page is marked not to be indexed.
What is a Sitemap?
A sitemap is a file that lists all the pages on your website and helps search engines find and index them. Think of it as a map that guides Google through your site, ensuring all your important content is discoverable. A well-structured sitemap is crucial for ensuring all your pages are indexed.
How to Submit a Sitemap to Google Search Console
Submitting a sitemap to Google Search Console is a straightforward process that can help ensure Google knows about all the pages on your website. Here’s how to do it:
- Log into Google Search Console: Access your account and select the property (website) you want to submit the sitemap for.
- Navigate to the Sitemaps Section: Find the “Sitemaps” section under the “Index” category.
- Enter Your Sitemap URL: Type in the URL of your sitemap (usually something like “yourwebsite.com/sitemap.xml”).
- Click Submit: Once submitted, Google will begin to crawl the sitemap and index the pages listed.
Example Scenario: You’ve recently revamped your website and added several new pages. By submitting an updated sitemap, you ensure that Google is aware of all your new content and can index it, helping your site gain visibility quickly.
Wrap-Up and Final Tips
Ensuring that Google indexes your website’s pages is essential for improving your online visibility and attracting more visitors. By understanding the basics of indexing, regularly checking your indexing status, and addressing any barriers, you can optimize your site for search engines. Remember to use tools like Google Search Console and the “site:” command to monitor your site’s indexing status and adjust as needed. Regularly updating and submitting your sitemap will help Google stay up-to-date with your content, maximizing your site’s visibility in search results.
If you’re looking for expert help to ensure your website is fully optimized and all your pages are indexed, The Good Fellas Agency is here to assist! Our team of SEO specialists can diagnose indexing issues, optimize your site, and help you achieve the best possible search engine rankings.
Contact us today to learn more about our comprehensive SEO services and start growing your online presence. Happy optimizing!
