Tired of manually creating DocuSign envelopes one by one? Manually uploading documents, entering signer details, and setting up fields takes time and can lead to costly errors. Studies show that automating document workflows can reduce processing time by up to 80%, freeing you from hours of repetitive tasks. But what if you could automate DocuSign envelopes with just one click after setting up our DocuSign Automation?
In this guide, I’ll show you how to create a powerful automation using Make.com that connects Google Sheets with DocuSign to automate DocuSign envelopes — complete with signers, CCs, and email details — saving you time and minimizing errors. Say goodbye to manual processes and hello to seamless, efficient document management.
Why Use Make.com For Workflow Automations?
Make.com is a no-code automation platform that allows you to easily connect apps and services without needing advanced technical knowledge. By integrating Google Sheets and DocuSign through Make.com, you can map data fields, define workflow triggers, and automate DocuSign envelopes effortlessly. Once set up, the process runs on autopilot, eliminating manual errors and saving you countless hours.
Why Automate DocuSign inside Make.com?
If you’ve been manually creating DocuSign envelopes, you already know how time-consuming the process can be. Manually adding signers, CCs, and documents for every envelope eats up valuable time that could be spent on more strategic tasks. Plus, navigating through multiple screens to set up fields adds unnecessary clicks and slows down the entire process.
By automating the process, you’ll:
- 🚀 Eliminate Repetitive Tasks: Automatically generate envelopes, pre-fill signer information, and add documents without lifting a finger.
- 🎯 Ensure Accuracy with Pre-Filled Information: Reduce human error by pulling data directly from Google Sheets or other sources.
- ⏱️ Save Valuable Time: Studies show that automating workflows can reduce processing time by up to 80%, allowing you to focus on high-impact work.
The Critical Components of Make.com
To understand how Make.com works, you need to know two key concepts: scenarios and modules. A scenario is the complete automation workflow, while modules are the individual steps that handle specific tasks within that workflow.
Understanding What A Scenario is in Make.com
A scenario is an automated workflow that connects different apps and services to perform tasks. Each scenario consists of a trigger (an event that starts the process) and one or more actions (what happens after the trigger) in modules to complete the workflow automation.
Example: You can create a scenario that pulls data from Google Sheets and automatically generates a DocuSign envelope with all the PDFs in a Google Drive folder when a new row of data is added to your Google Sheet.
Scenarios allow you to automate processes that would otherwise require manual work, saving time and reducing errors.
What Are Modules In Make.com?
Modules are the building blocks inside a scenario that define the tasks Make.com performs. Each module represents an action or a trigger from an app or service you connect.
Types of Modules:
- Trigger Module: Starts the scenario (e.g., when a new row is added in Google Sheets).
- Action Module: Performs a task (e.g., create a DocuSign envelope or send an email).
- Search Module: Finds or retrieves data (e.g., look up a document in Google Drive).
You can connect multiple modules to automate complex workflows, ensuring seamless data transfer between your favorite apps.
Steps to Automate DocuSign Envelopes
Now that you understand the basics of Make.com and how scenarios and modules work, it’s time to dive into the process of building your own automation. In the next steps, we’ll walk you through setting up an account, creating your first scenario, and connecting the right modules to automate docusign envelopes.
Heads Up: Make sure you have a make.com account before starting!
Step 1: Create Your Control Sheet in Google Sheets
The control sheet serves as the foundation of your automation. It will create multiple variables we will save and use throughout the workflow automation. Here’s how to set it up:
- Open Google Sheets: Create a new spreadsheet.
- Add These Columns: Include the following columns:
- First Name
- Last Name
- Signer Email
- CC Name (if needed)
- CC email (if needed)
- Enter Your Data: Populate the rows with information for each envelope you will need to create.
Step 2: Create Your Scenario in Make.com
Your first step is to start building our scenario to automate DocuSign envelopes.
- Log in to your Make.com account and click the “+ Create a new scenario” button on your dashboard to open a blank canvas.
- On the top of your screen click where “New scenario” and type in a name for your scenario
- Click the Save icon (looks like a floppy disc) to save your scenario
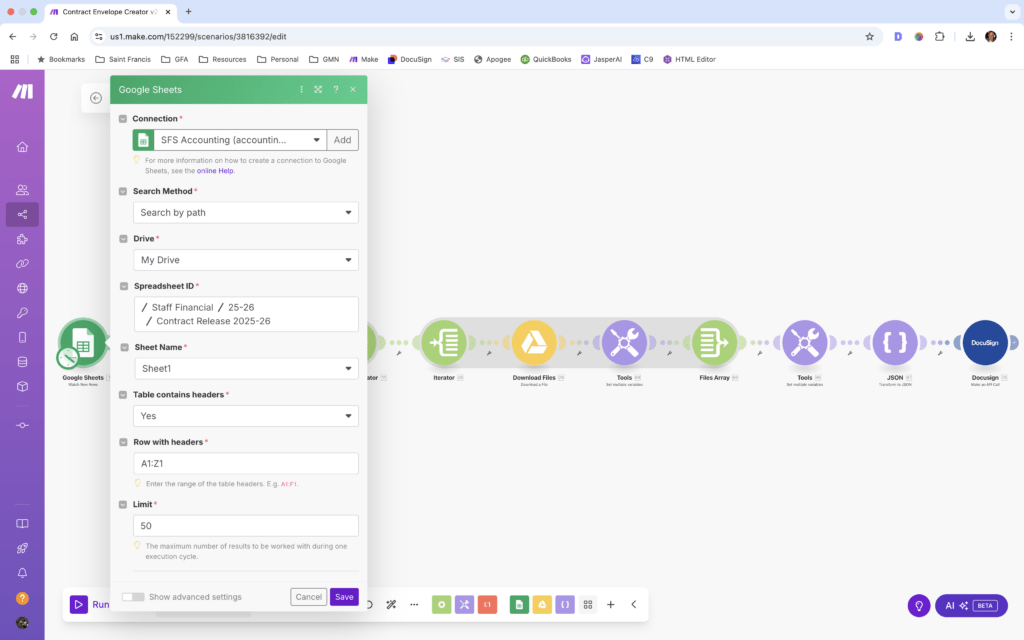
Step 3: Connect Your First Module
Next, lets connect our Google Sheet we created earlier to this scenario.
- Click on the grey plus icon and type in Google Sheets
- Set Your Trigger: Select “Watch Rows” so that Make.com monitors any new rows added to your control sheet.
- Authorize Access: Grant Make.com permission to access your Google Sheets account.
- Locate your Google Sheet in your drive inside the module so your automation knows where to look
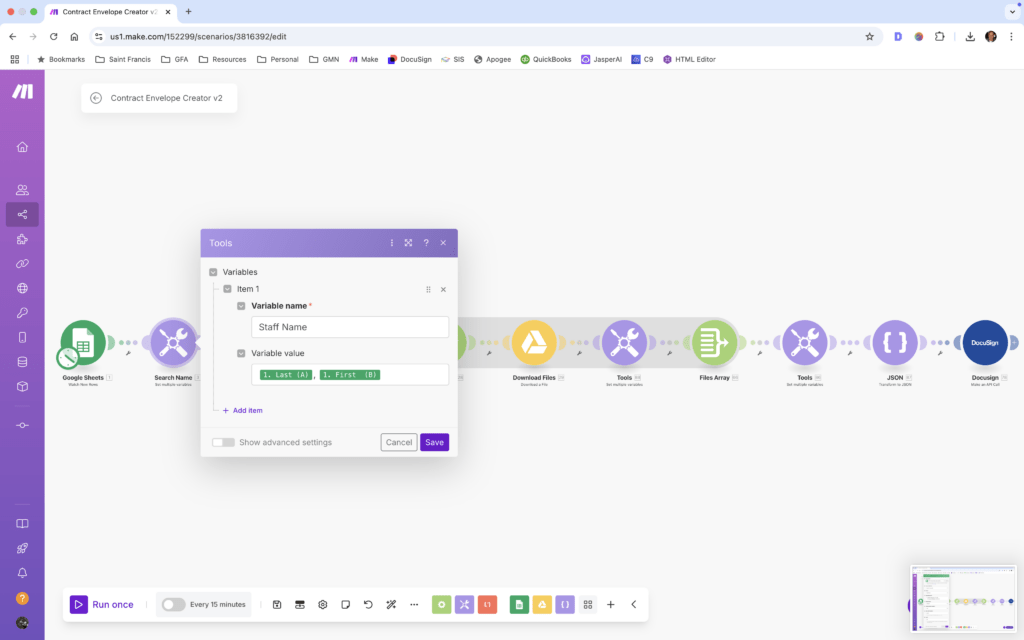
Step 4: Add A New Variable Module
From this point forward we will be adding different types of modules to help Make transform the original line of information from your Google Sheet to actively gather PDFs and then create array data from that information so we can automate DocuSign envelopes.
- Click the “+” bubble on the right side of the Google Sheet Watcher you just finised
- In the window the pops up type in set variable and select the first icon
- In VARIABLE NAME type the name you want to see this variable displayed.
- In the VARIABLE VALUE you want to click in the row and do the following:
- Locate the Google Sheet Watcher variables
- Click on the fields you want you want in your variable
- In this autoamtion I did “last, first” because it matches the naming for the merged PDFs I already created.
- Click SAVE and your variable is set to use later!
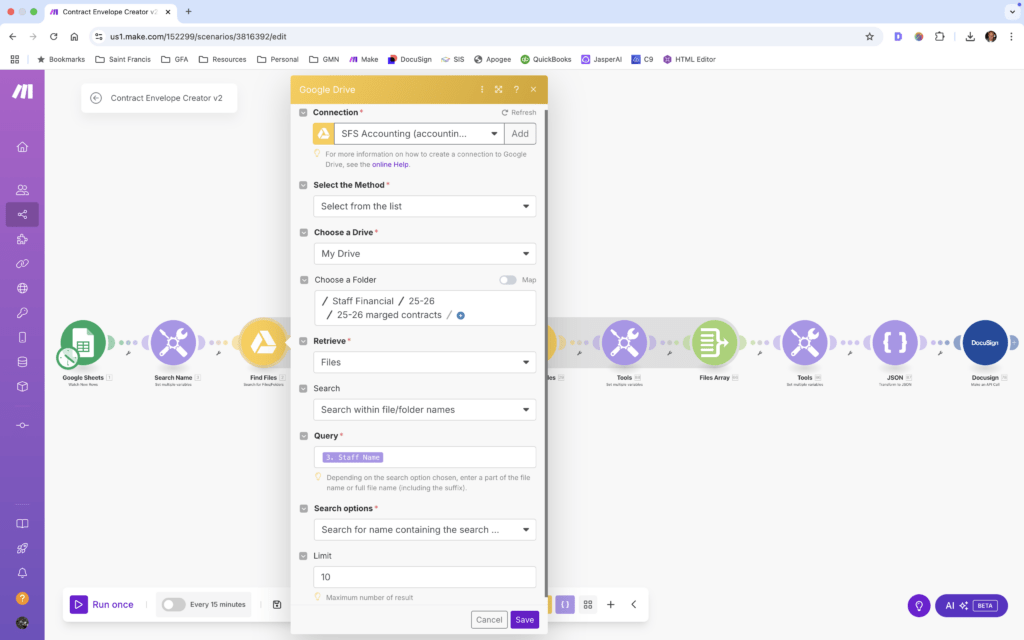
Step 5: Search Drive For Files And Create An Array
In this step you are going to search your drive for all the files that match the variable module you just created and then you are going to place all the drive files in an array. These must be placed in an array because the DocuSign API has a very specific JSON format it expects (we will explain this later).
Search Drive For FIles
- Create a Google Drive Find Files module and connect your account (Be sure to name different accounts clearly!)
- For Method choose SELECT FROM LIST
- Map your Drive to the folder where the files you are searching for are located
- For Retrieve we are looking for FILES
- For Query, select the saved VARIABLE NAME from the previous step
- For Search Optons you want SEARCH FOR NAME CONTAINING THE SEARCH TERM (This means it will search files for the variable we just saved
Save the Array
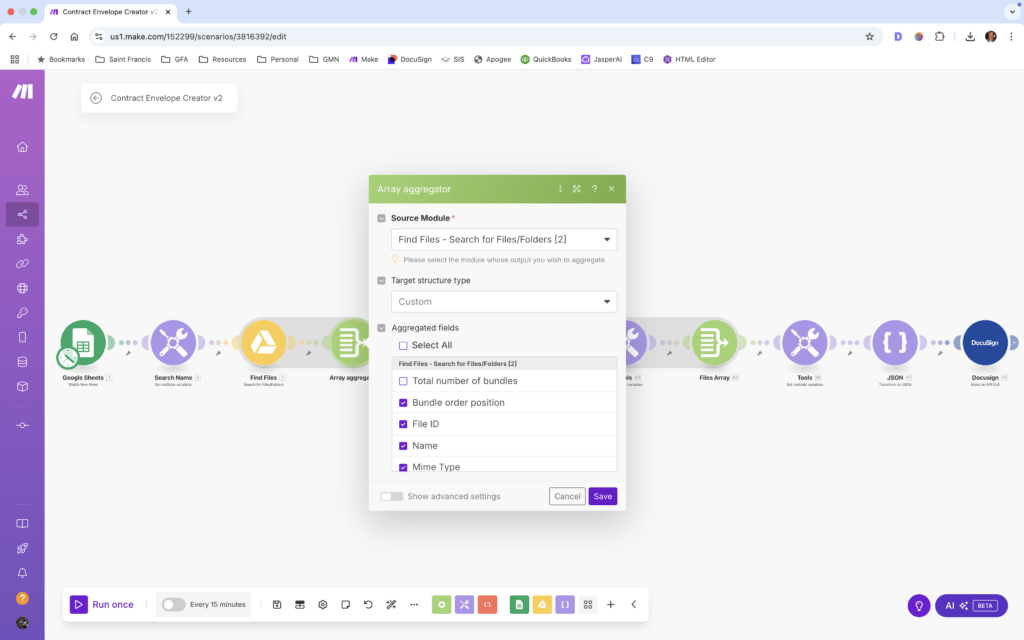
Since DocuSign expects this format we need to take the files that our automation just found and place them in an array. We do that by following these steps:
- Create an ARRAY AGGREGATOR (This simply means its collecting a group of files and making them in the structure of an array).
- For Source choose FIND FILES so it collects all your found files from Google Drive
- For Format Structure Type choose CUSTOM
- Then choose the options you want to add in the array (This specific automation only requires the following: bundle order position & file name)
- Click SAVE
Now, you have created the array you can iterate through on the next step to format to meet the exact DocuSign API requirements.
Step 6: Iterate The Array
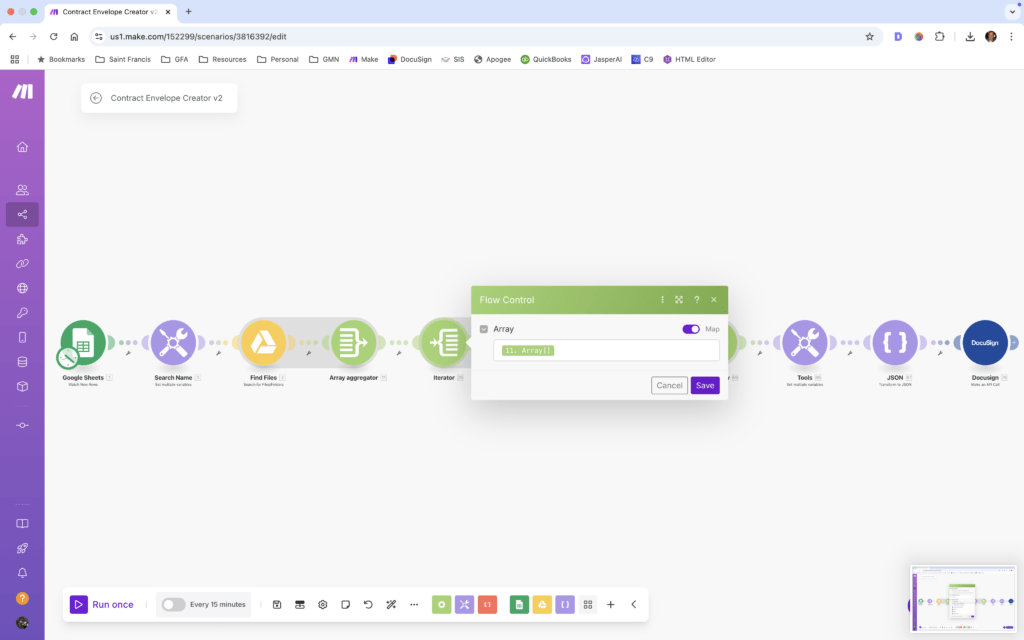
What does iterate over any array mean? Simply put, iterating means going over each item (In this case, we are iterating over all the PDF document objects that matched our search query) in the array individually to make changes or add variables as needed. This critical step helps you automate DocuSign envelopes by allowing you to have different numbers of documents in each envelope you are creating, and in the process, you are customizing the data in the array to match the DocuSign API structure.
Connect an Array Iterator
You want to create an ARRAY ITERATOR module and select the OUTPUT ARRAY from the previous aggregator. This process lets you use make to run modules, processes, and functions over the array and apply it to each individual object inside the array structure (We will be assigning a documentId that is critical for the DocuSign API momentarily)
Download the PDF Files
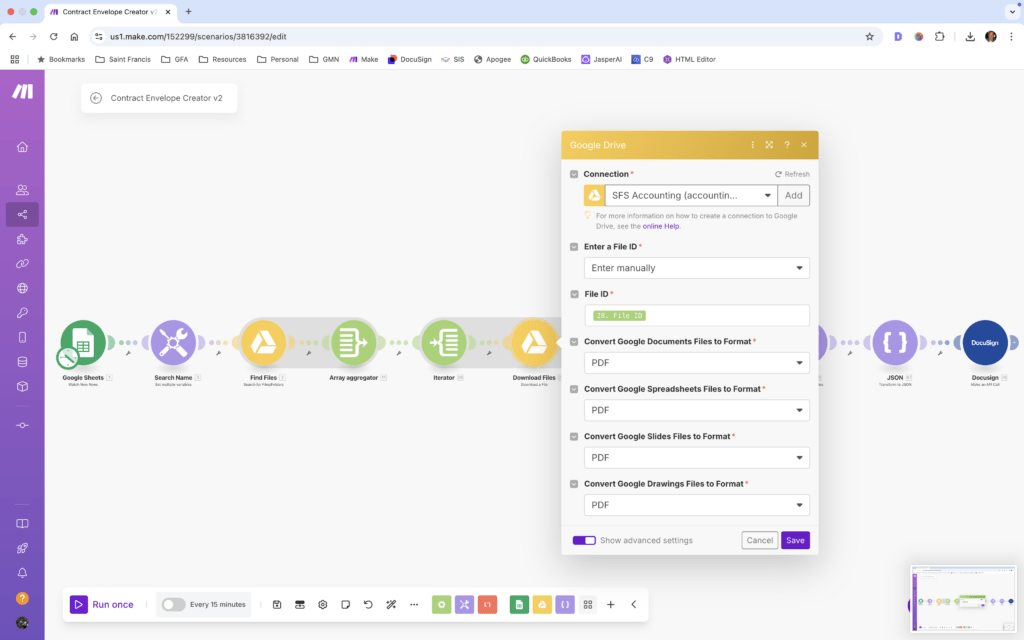
Now that we have the Array ready to iterate through, we want to download all the files our search query found in step 5. Here is how we set that up:
- Connect a GOOGLE DRIVE FILE DOWNLOAD module after the ARRAY ITERATOR you just opened
- For Enter a File ID you want to choose ENTER A FILE MANUALLY because this allows the iterator to input the variables from the previous step for you.
- Then in File ID you want to choose the FILE ID from your iterator (This pair now has started the sequence needed to get all files the query matches)
- Set your download formats as needed. I set all of mine to PDF for simplicity.
Saving Custom Variables For DocuSign API
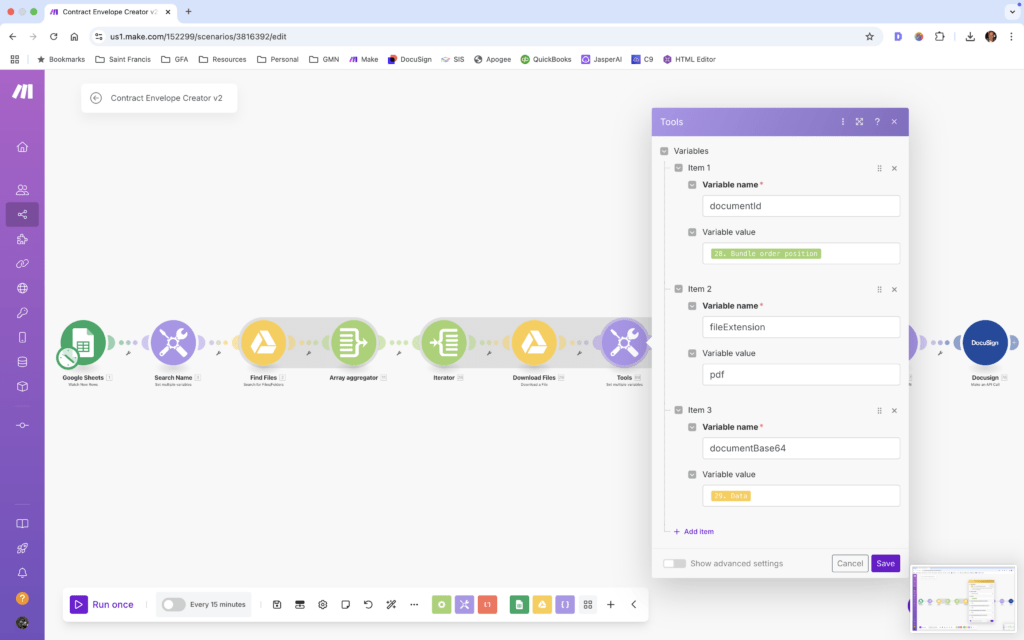
Now that we have the files identified and downloaded, we need to match 3 new variables that are required in DocuSign’s API to the data we have collected in our automation. The three variables we need to create are documentId, fileExtension, and documentBase64. Each of these variables tell DocuSign specific things regarding each document that is being uploaded into our envelope. Here is what each variable means:
Mind Your Business Newsletter
Business news shouldn’t put you to sleep. Each week, we deliver the stories you actually need to know—served with a fresh, lively twist that keeps you on your toes. Stay informed, stay relevant, and see how industry insights can propel your bottom line.
Subscribe to Mind Your Business
- documentId: This is an integer number to uniquely identify each separate document in the packet
- fileExtension: This tells DocuSign what document type to expect (PDF, doc, image, etc)
- documentBase64: This is the binary code that is the actual data of the document.
Let’s create the variables now and assign them their values for the API call.
- Connect a SAVE MULTIPLE VARIABLES module to your chain
- Click the + Add Item
- For the first variable name type in documentId (THIS IS CASE SENSITIVE) and set the variable value to the BUNDLE ORDER POSITION from the Iterator
- The second VARIABLE NAME is fileExtension and for the variable value type PDF.
- The third VARIABLE NAME documentBase64 and for the variable value set it to match the DATA from the Google Drive Download Module you completed earlier in this step.
Close The Array
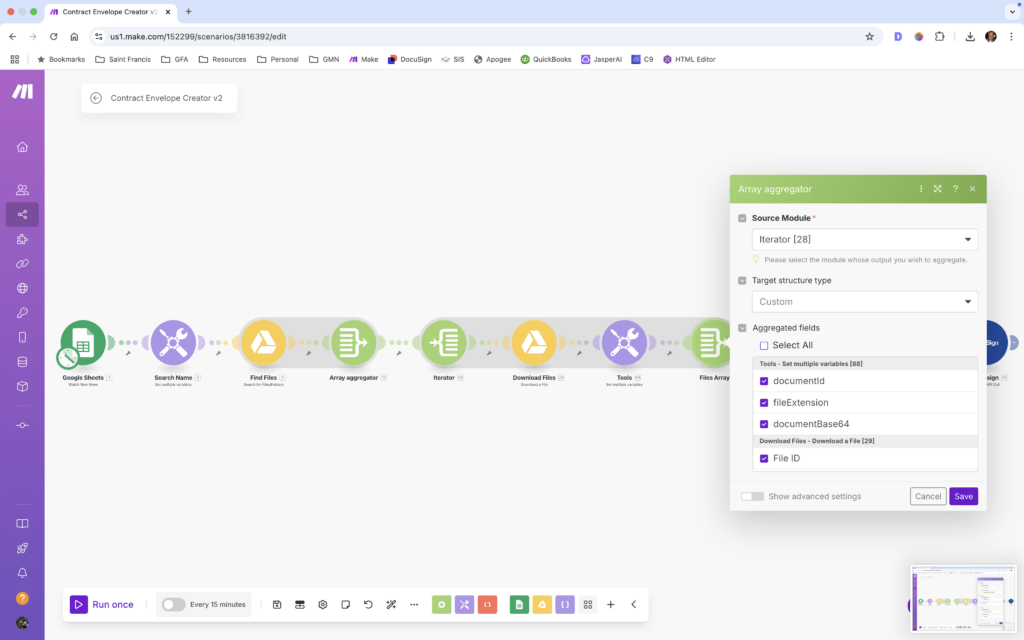
Now that we have customized the output needed in our array with the new variables, we need to AGGREGATE it together so its a single array. To do this we need to add a new module and select a few very specific items to carry forward.
- Connect an ARRAY AGGREGATOR module to the save multiple variables module you just completed.
- For the Source Module, you want to choose the ITERATOR we created at the start of this step.
- Leave Target Structure Type as CUSTOM (this allows you to choose what parameters to pass through in the array structure)
- In Aggregated Fields, Choose the following
- documentId
- fileExtension
- documentBase64
- FileID
- Name
- Data
- Click SAVE
By doing this, you have just created the array that will eventually be passed into DocuSign’s API call for the documents that are added to the envelope dynamically. That means if each envelope has a different number of documents, they are all added and correctly placed in the envelope.
Step 7: Flatten Your Array & Convert To JSON
We need to take 2 steps to transform the array to the exact expected raw array that will go directly into the actual API call. Since Make will automatically wrap a parent array around the data we just manipulated, we have to remove that parent array and then convert the flattened array to JSON string so it matches the API call requirements. Let’s get to work.
Flatten Your Array
Flattening an array means reducing a multidimensional or nested array (an array where some elements are themselves arrays) to one single array with elements in the original order. In Make we need to do this a very specific way.
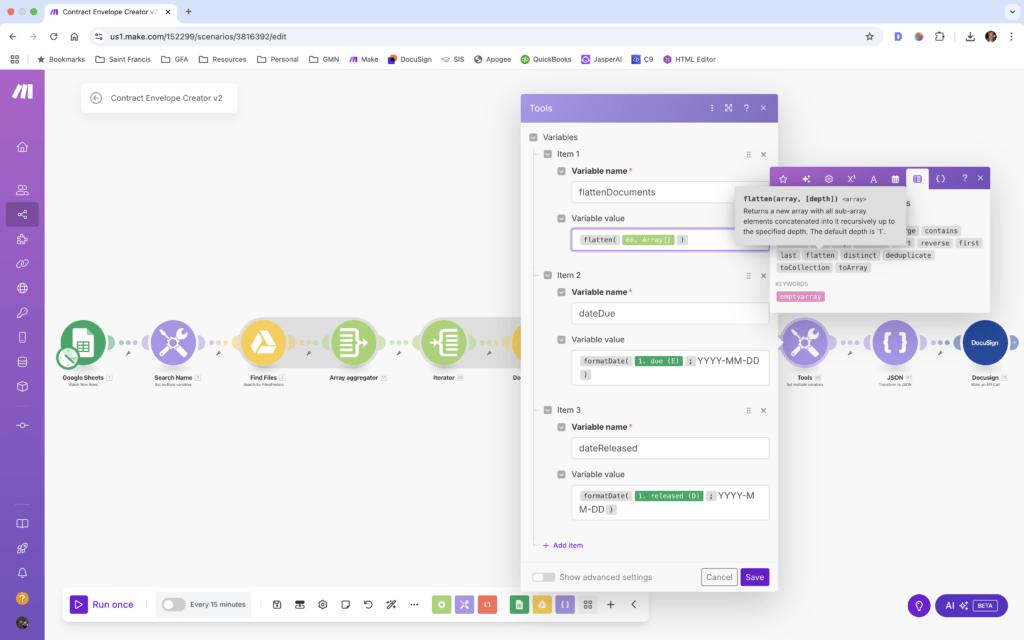
- Connect a SAVE MULTIPLE VARIABLES MODULE
- For the first Variable Name, you can use whatever name you like; I am going to use flattenDocuments, so I know this is just the flattened array.
- For the Variable Value, click in the field and then at the top of the variable selection window change the view to the DATA TABLE (Which is located between the calendar icon and the braces {})
- Click on grey button FLATTEN.
- Then click the Hollow Star on the variable screen to switch your view back to your variables from your modules
- Select the output array from the previous Array Aggregator Module we just completed.
Save Your Created Date
In the same Save Multiple Variables module we are working in, we need to create an ISO formatted dated to be able to automate our Docusign Envelope.
- In the active Save Multiple Variables Module hit the + Add item
- For Variable Name type in dateReleased
- Click in the Variable Value and click the calendar in the purple strip at the top
- Select Format Date
- Then, before the : you need to select the date from your Excel sheet (my value was column D), and then after the: you type in YYYY-MM-DD
- Click Save
Convert The Entire Array To JSON String
The part of this step is converting the array with all your data to a JSON string to be injected into our DocuSign API dynamically. But what is JSON? JSON, or JavaScript Object Notation, is a lightweight, human-readable data-interchange format that uses key-value pairs and arrays to represent structured data, commonly used for transmitting data between a server and a web application. It’s easily parsable, so it’s a very preferred format for API calls. Let’s convert it now.
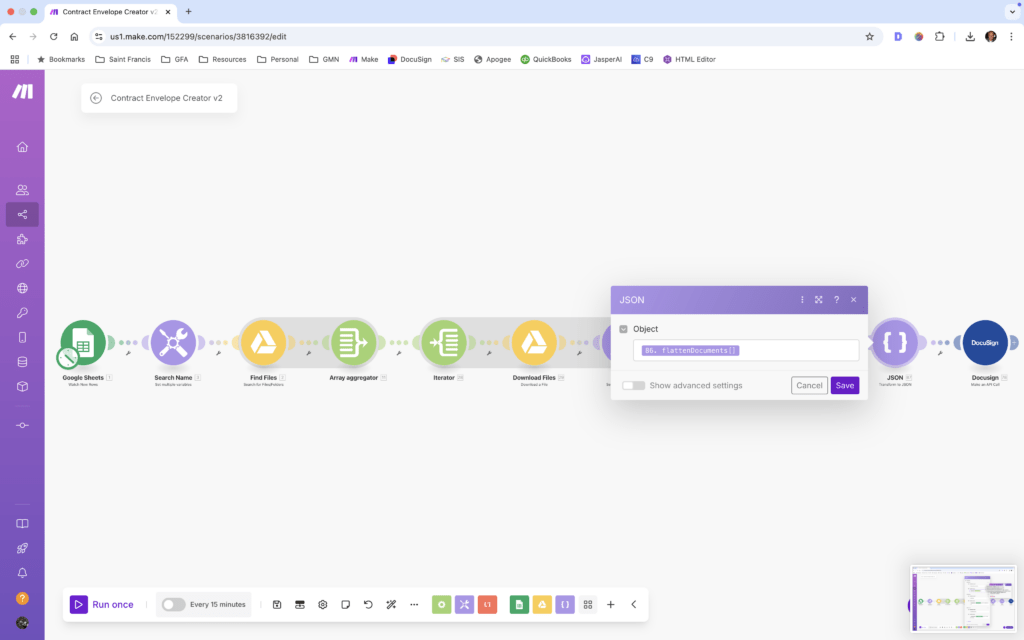
- Create a new module and type Transform to JSON
- In the Object field choose the variable we just saved flattenDocuments
- Click Save
We are ready for the last step in our Automation DocuSign Envelopes automation now! The dreaded API call… lets go work that out now.
Step 8: Formatting The DocuSign API Call
This module and step will be the most technical of all the steps before it. It is probably best to break this into 3 sections: your account, method & headers, and then the API Body. This breakdown will allow us to understand better the API call that is the secret to automating Docusign Envelopes.
Your Account Information
Before we create the module for the DocuSign API call, you need to make sure you have a developer account with DocuSign. To check if you have this done already, log into DocuSign and go to your admin area, scroll to APPS & KEYS. If you see an account listed under API Account ID, then you are ready to proceed!
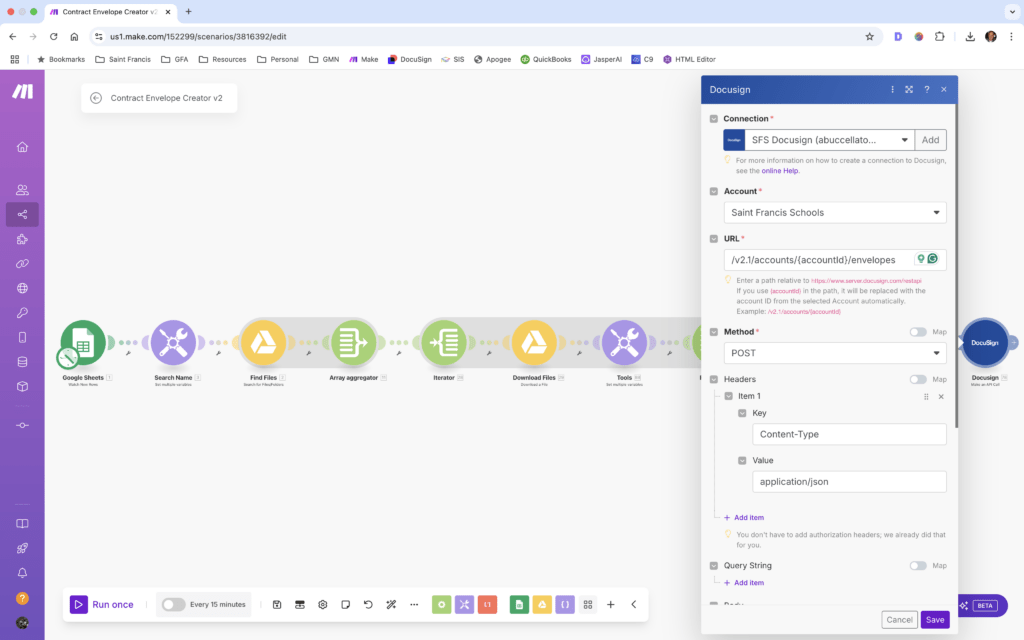
- Connect a new module and type in DocuSign, then find Make an API Call
- Connect Your Docusign Account in the connection and account fields
- In URL place this path to call /v2.1/accounts/{YourAPIaccountID}/envelopes
Now we have told DocuSign what account is going to make the call and what type of content we the API call is going to make for us.
API Method & Headers
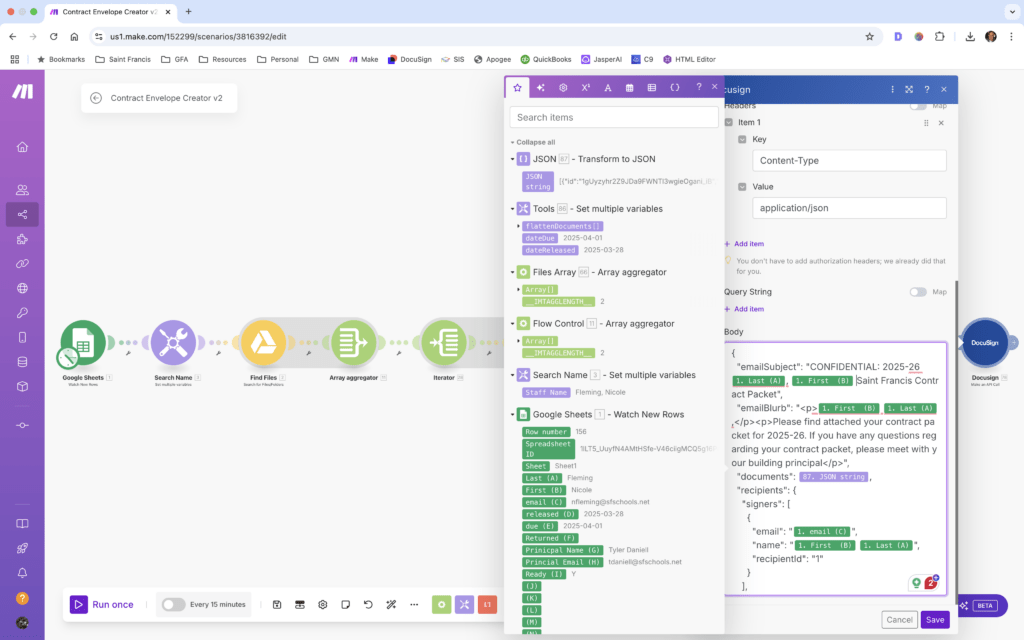
Since we are creating envelopes, we must change the default call type to a POST call. To do this, you change the method field to POST. Leave the headers fields alone as they are because their default values tell the API what Content-Type to expect. By default, it already has application/json, which indicates that the request body format is JSON. If you remember the end of the last step, we converted our array to a JSON string to match the expected content-type.
API Body
The API body is where the magic of automating DocuSign envelopes happens! Here we set up the actual call that is going to create the envelope and add all the supporting data it needs to set expire dates, warnings, and notifications. I am going to provide you with the API body I use in my calls and then will explain it piece by piece.
{
  "emailSubject": "Your subject here",
  "emailBlurb": "<p>your email here with full html markup</p>",
  "documents": {{87.json}}, //this field is my exact array from the JSON string output
  "recipients": {
    "signers": [
      {
        "email": "{{1.`2`}}",
        "name": "{{1.`1`}} {{1.`0`}}",
        "recipientId": "1"
      }
    ],
    "carbonCopies": [
      {
        "email": "{{1.`7`}}",
        "name": "{{1.`6`}}",
        "recipientId": "2",
        "routingOrder": "2"
      }
    ]
  },
  "status": "created",
  "from_date": "{{86.dateReleased}}",
"notification":{
      "useAccountDefaults": false,
      "expirations":{
          "expireEnabled": true,
          "expireAfter": "3",
          "expireWarn": "2"
      },
      "reminders":{
          "reminderEnabled": true,
          "reminderDelay": "2",
          "reminderFrequency": "1"
      }
  }
}
If you have never seen an API call before, they are JSON objects with key-value pairs that the API expects to see and handle. I am going to break down each object value so you understand what it means. Please keep in mind that when you edit this call, you must keep the structure the same or the call will fail.
The first two emailSubject and emailBlurb are very self explanatory. You can give the envelope the exact subject and message you would like. The emailBlurb accepts full HTML markup so you can add links and formatting (think paragraphs) as needed.
Documents is the critical piece here. This is where you need the JSON string we converted because that is what DocuSign is looking for to create each document in your envelope. Make sure your variable references the correct module!
For Signers, you can assign who needs to sign and receive a carbon copy with the object and sub-array information you provide. In my call I have one signer and one carbon copy. The emails and names are taken from the master sheet module (see the formatting warning above).
The Status is going to tell DocuSign what to do with the newly created envelope the API call is making.In this example, I have it as CREATED, which means it will leave it in my Drafts area to check and work on later.
The fromDate is the date that Docusign will create the envelope for expiration tracking. If you would like an expiration timeframe other than 120 days you must keep the entire Notification block intact and only change the integer numbers for your specific needs.
Wrapping UP Automating DocuSign Envelopes
Manually creating DocuSign envelopes is time-consuming, repetitive, and prone to errors. This guide walked you through building a powerful automation using Make.com that seamlessly connects Google Sheets with DocuSign. From setting up control sheets to mapping signer data, creating document arrays, and formatting the final API call, you’ve now learned how to automate the entire process with just one click.
By leveraging Make.com’s no-code platform, you eliminate the guesswork and reclaim valuable hours each week. Whether you’re sending one envelope or hundreds, this workflow ensures precision, speed, and peace of mind. Set it up once, and watch your document management run itself.
Ready to simplify your document workflows?


